Tuesday, December 20, 2011

My Gift of Peyote Patterns for You!

I hope you enjoy these 8 peyote patterns, designed for Hanukah but with a few that are universal. Each medallion can become a pendant, cuff or brooch, or incorporated into a greeting card, work of fabric art... it's up to you! I made one into a necklace.
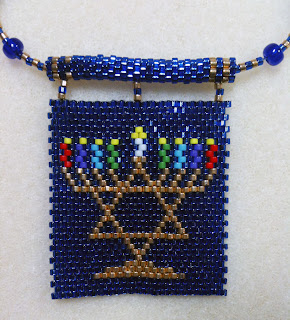
Worked in size 11 Delica beads, the actual size is h x w 1 5/8" (42mm) x 1 1/2" (40mm). Note how the side edges have the in-out beads. This enabled more horizontal straight lines in my designs. It also allowed me to use the bead holes along the top edge to attach a rolled peyote tube as a bail through which I strung my beaded cord. These patterns are easy to follow in either peyote or brick stitch.

A bit about Hanukah for those who wonder if Jewish kids really all got gifts for 8 days. I personally did not. With four kids in my family, are you kidding? Do the math! Plus, this isn't a "holy" day. It's much more of an historic celebration. Here's the short version:

Hanukah means "rededication." In 168 BCE when the Syrian king banned Judaism and took over the temple, the Jews took it back led by Judah the "hammer", the Macabee. After the battle the remaining temple oil (for the eternal flame over the Torah ark) seemed too low to last for more than a day, but it lasted 8 days --some say that's the time it took until new oil could be created. The festival is full of games (like playing with the dreidle) and fried food (more oil, that's right!) Traditional yummies include donuts, called "sufganiot," and of course my personal favorite, latkes, or potato pancakes.

No matter how you spell it, Hanukah is a festival of light and celebration for the Jewish history of survival against all odds.
So happy Hanukah, or as we say in my wonderfully multi-cultural house, Hanuchrismakwanzstice!

And more than anything, HAPPY BEADING!

Menorah, with all 8 candles lit,
reflecting the entire Festival of Lights.

Peace Dove. When are you showing up?


Dreidle, the toy top with Hebrew letters
standing for the words
"a great miracle happened there"
referring to the Hanukah story.
"Chai", Hebrew word for Life.
The toast "l'chaiim!"is to drink to life!


Hamsa, or Chamsa
Middle Eastern symbol for the protective
hand of Gd. The Hebrew word for five
(as in fingers) is "chamesh."
The  flag of Israel is designed
to look similar to a tallit,
or prayer shawl.


The Torah contains the 5 books of
the Old Testament. Portions are read
at every Jewish service.
Torahs are hand scribed on scrolls
to this day. No errors are allowed,
so they are written in sections
If a mistake is made, only the
one section needs to be rewritten.
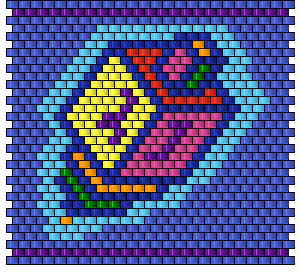
Tree of Life, "Aitz Chaiim"
in Hebrew
shown here with day and night


Monday, October 24, 2011

More about how to learn PEYOTE STITCH

So many people have contacted me lately with the desire to learn peyote stitch. Perhaps it is the release of the new emag Fabulous Peyote Stitch with Crystal Accents.  Who can resist adding crystals to a stitch so wildly popular?
Everyone wants to learn!

Peyote stitch is sometimes called the gourd stitch. It is considered a Native American technique but is found in many other cultures around the world. Why is it called "peyote?" Wiki says the gourd stitch was traditionally used to decorate ceremonial objects in rituals involving peyote mushrooms, sacred rituals. That's all I know about it except it has to be THE most popular bead stitch of all time.

There are many version of peyote stitch, most commonly even-count peyote and odd-count peyote, referring to the number of beads per row. There are design advantages to which one you choose. Look at my original You Tube video for even-count peyote here:

 
It gives you some idea of how I teach; I draw the diagrams for you, and it has become my signature method. Since these original Doodlebead videos were made I've had my lessons from the TV show Beads, Baubles, and Jewels made into commercially produced DOODLEBEADS DVDs. These have much cleaner videos, but these originals remain my favorites. I made them using iMovies, and they were indeed to impetus for the product that became the DVD. :-) I hope to do more, with music of course. Edutainment, that's what the world needs!

You can buy my Doodlebeads DVDs--there are two volumes so far-- and I suggest Volume I to start. Along with the videos you will have access to printable diagrams as PDFs so you can follow the video while looking at the diagram I use in the tape. Go to my Sleepless Beader Etsy shop:


In case you are really new to bead stitching, there's also tubular, circular, and multi-drop versions of peyote and about every other stitch. So think how many things you can create even if you only know one stitch, such as peyote. It's rather exciting.

Also, using Delica or Toho cylinder beads gives peyote that perfectly flat fabric many beaders admire. Try Delica size 10s--they are a bit larger than size 11 and should make it easier on your eyes, and help enable your success. And remember to keep your thread tension snug and consistent, that will also help your work turn out best.

Happy Beading!
PS: Thanks to Joy D. for inspiring me to get this post out there.

Saturday, October 8, 2011

Playing with Beadalon Rubber Tube

For my Oct 6th appearance on Jewelry Television, Beadalon asked me to design using their 1.7mm rubber tubing, in both black and frost colors. Slender as a flower stem but very durable, the tubing is hollow which means WooHoo! You can thread through it with beading wire or Artistic Wire (less than 20g) and it cuts like buttah with a scissors, snips or craft knife. Was I a happy camper! (Y'all know I love the look of rubber in jewelry designs!)

Since lots of people ask about how ideas come about for my finished work, I'm sharing some of the constructions I played using the tubing. 


My first idea was to cut black and frost tubes into pieces and string them with 4mm round Swarovski Siam crystals, for one of my fave combos of  red and black and white. I curled .015 beading wire (same way you do with curling ribbon) to give the strands movement and more body. This necklace is unfinished. I think it will succeed if there are tons more strands for a more substantial presence, and, having (for the moment!) a limited supply of the tubing, I moved on to a new direction.
Having a pile of cut pieces of tube leftover, I took beading wire--not curled--and crisscrossed through the tubes and crystals in a traditional netting stitch. The only diff here between beadwork netting and this is that I strung the pieces of tubes instead of beads between the junction crystals. I'm not quite sure yet how to give this a polished finish as a piece of jewelry but it sure looks unique around a glass holiday ball or votive.
Here I strung doubled over lengths of the frost and the black tubing through a pendant bail, which I taped to a table on a wire. I strung one of the new Swarovski silver lined big holed beads intending eventually to do some sort of weaving with the tubes, as in those lanyards we all made as kids. (With gimp, remember?) I still need to work out that process.
Grabbing a handful of the tubing inspired me to work with it in bunches. I cut pieces into varied lengths, strung them with beading wire, and crimped more Siam crystal rounds on each wire end. I simply took Beadalon crimp beads (not tubes) and squashed them flat with a chain nose pliers. The crimp beads are small enough to be innocuous yet add a touch of silver.


Here's how I wired the crystal-tipped tubes together so I could hang them from a pendant bail. Totally easy!
More multiples of tubes, wired with beading wire and crimped onto a slide multi-strand clasp. I attached a pendant bail at the center of the tubes.

Here's the finished pendant, using stacked turquoise donuts and a whirl of tubing wired with Artistic Wire.

Using the frost color tubing seemed perfect with Beadalon's SP Quick Links and chain. I strung short lengths of the tube on eye pins with Swarovski Comet Argent Light 4mm bicones, and used simple wire wrapped loops to space the embellished eye pins along a lovely rolo chain. This necklace sparkles big time! So – the discovery I made in this play time with rubber tubing was that it can look dazzling and elegant, as well as industrially chic.
Do you think?


Thursday, September 29, 2011

Should you sell jewelry you learn from a published project or in a class?

This is the real hot button topic, isn't it? I've been engaged in a very lively discussion with Cindy,  a new fellow beader. She's agreed to allow me to share our exchange thus far, and we'd both be interested to hear opinions and possible solutions to this and related issues.

Cindy was making things she learned from a book, being somewhat new and not ready to forge her own designs yet. During one convo she said she thought that she could sell her work as long as she mentioned the original artist.

I said: It is generally considered acceptable to make and sell pieces not your own design but only in limited quantities. For instance, at your own home show, local craft fair, to private clients, or giving as gifts. But I've had my own designs being re-created and sold on Etsy where I sell my own work--the same design, and for less money than I asked for my piece. I did not like it but the beader doing it took great umbrage when I asked her to stop selling it on Etsy. She felt that once a design has been published it is totally up for grabs. So it's an ethical question that continues to be a discussion. What do you think? You made the piece so you should be able to sell what you made, right?

Cindy said:  I totally understand how recreating someone else's work and selling it would be upsetting. I have very mixed feelings about it but of course at this time I haven't created something of my own to be copied so have a limited view and feeling on this matter at this time. It is confusing because you buy a book, magazine or etc. to learn how to create items but then not being able to sell them after you make it is disappointing. I guess the feeling might be if you don't want it copied then don't produce instructions on how to make it. It is a very complex situation that I'm not sure there is a clear answer to. When I become more adventurous and confident in my beading perhaps I will then be able to come up with my own creations but until then I need all the help I can get.

I said: You are among many jewelry-makers who don't make up their own designs but want to sell their efforts. I get it completely. It is a fine line--for all of us. Designers realize that people want to make our projects. It's why we teach and sell to magazines. That's how we earn a great part of our living. But we also sell our finished work. So when students (classroom or magazine followers) take our designs and mass produce them for sale, it takes away from our livelihood. It's the "making money from another person's design"  that's the bugaboo, and not one easily resolved. All magazines ask that readers be sensitive to the authors rights and not take advantage. OF COURSE people want to sell what they learn to make. But is it okay, or when is it okay?

If someone learns to make my original bracelet from a magazine, should they make and sell it over and over on Etsy?  Many artists don't publish tutorials for this very reason, and that's sad for students who could learn so much from those pros.

How about at their neighborhood craft shows? I say sure if it's not in my home town.
On their own web site? HM, maybe. So ask me. But don't you want to make your own originals?

On Etsy?  I say this overlaps my market, so I'm not gonna like it. Shouldn't I get a commission as if it was a licensed product? If you want to make and sell my designs, please contact me today! We'll make some sort of contract where I get a small percentage of your sales and you can make and sell as much of my work as you like.

And speaking of licensing... I have Disney jewelry I made for myself to wear when I go to Disney World. I DO NOT and WILL NOT EVER make them to sell or even to give as gifts! Even tho' the form of my jewelry and the use of materials is quite unique, it is not my mouse. So I walk the walk, beady peeps. (But anyone from Disney can contact me about officially designing for them. My designs are definitely Mouse Couture.)

If someone takes my class, can they now go and teach that project in classes of their own?
Only with my permission.

Should someone buy my tutorial once for $10 and then charge other people $25 to learn that project from them in their bead shop?
That takes bread from my table, unless they buy my tutorial for each student and THEN tack on their fee as an instructor.

Who invented peyote stitch, anyway?
I hear this a lot. It's "just" peyote  stitch. You didn't invent that. True, but chances are the published project in question is more than just peyote.

I think seed beading is different from other jewelry making. The materials are similar, while other jewelry designs can switch out types of beads, chain, or wire, and become much more original even if the same technique is used. It is not as easy to invent something new in a seed bead work. Perhaps this is why beaders appear much more proprietary.

What do you think?
Can't wait to hear what you all say.


Thursday, August 25, 2011

Play Big with your Materials!

I tell my students, play with your beads. Play with your materials. And then I get hold of this really cool new product -- Artistic Wire Mesh--from Beadalon, and I don't follow my own advice--at first.

Check out my progression from dainty dabbling to dynamic play.

First I cut small 6" pieces of Artistic wire mesh from a one yard piece. I think I was trying to be frugal. So I pulled my little pieces tentatively into  ginko leaf shapes, which I wire to Beadalon rubber tubing. YAWN!

Ok maybe aspects of these are okay and I will apply some of the design to other works. But these are certainly not a showcase for the Artistic Wire Mesh.
 What was I afraid of? I fold again into little controlled crinkles.
And wire them up with pearls. Not pushed far enough.
I needed to loosen up my grip!
I get a rush of abandon and take my whole 2 yard stash out. With great glee that I pulled it, crunched it, played with the way it molded and stretched--and finally, FINALLY, took advantage of its best properties--the generous amount of stretch, the firm but not scratchy holding of a shape, the density of color in the crunches and folds.
What did I ultimately come up with? Stay tuned! And remember--you get what you PLAY for!

Monday, July 11, 2011

Jewelry Television July 2011

 Knoxville, Tennessee, home of Jewelry Television. I was so honored to have Beadalon and John Bead Corp ask me to represent their products. Never realized how much FUN it was going to be!

I've talked before about how much preparation happens before taping TV shows, right? This was no exception. Even with all I did at home before flying to Knoxville, I ended up spending a whole day there working on new loom pieces. Luckily, there was a marathon of all the Indiana Jones movies on TV, so I set up on my big comfy hotel bed and beaded happily away. It was too hot out to do much sightseeing anyway. (But next visit, Dollywood!)


Yes, I'm totally warped. 3 looms at once.

Using the Spin n Bead is great--I never would make something like this without one, since stringing beads one by one for each strand braided here would take forever.

Showed these loomwork cuffs on Facebook already. That Beadalon loom is really easy to use. Definitely fast--and addicting!

Earrings loomed with the different Delica kits from John Bead. Each colorway collection is for sale on the JTV site. If they haven't sold out yet!

Margo and Kim, the Jewel School hosts, getting ready at their desk in the studio.


I'm setting up at my little desk on the set.

And a short video tour of the Jewel school set right before taping, with a little cameo from Daniel John of John Bead Corp who came down to watch the show. I'll let ya'll know when my next appearance will be and what cool stuff I'll be sharing!


Beads, Baubles, and Jewels July 2011

Working on the PBS tv show Beads, Baubles, and Jewels is fun work, but most of the work goes on before we even get to the studios in Cleveland Ohio where the show is taped. Each segment needs finished pieces (eye candy, right?) And, because we don't have much time to get the lesson across, many of the projects have stepped out stages of techniques made ahead of time so we can effectively teach you all how to do something in such a short span of time. Keep in mind most of the designs are original and newly invented or reinvented just for the show, so there's a lot of design thought put into each lesson. Here are some examples of what I did for the new Series 1500 which will air in September:


For the Beadalon sponsored colored wire and large bead segment, I took size 2/0 seed beads from John Bead and wove them into a stylish wraparound cuff with a Tierra Cast wing charm. wanting to show the colored wire, I chose copper colored designer stringing wire to play off the bright blue beads, and used copper findings. Plus I added in Swarovski Caribbean Blue rondelles to push how to use big beads and colored wire in bead weaving.


For the lesson on using seed beads to embellish larger wood and resin beads, I already had tons of beaded beads 'cause I LOVE making those.


Getting ready for the spoke bead lesson still took hours of preparation time to show the stages of each beaded bead in a only couple minutes of air time. Here you can see just two of the stages of spokes being stitched ahead of time, so on the air I can pick up a stage in progress and do a couple stitches, and describe the steps without taking time to do all the actual stitching.


At the studio, each lesson is set out on large cookie sheets with all that will be shown on the air-- stepped out sections, materials and tools, and finished jewelry. I tape my stepped out sections on large white index cards to transport them from home to studio--and each one has a needle prestrung on the WildFire thread, also to save time on the air.

So much work, right? But it sure builds my excitement to get revved for each show!

I hope it all works for you--but be sure to let me know how I can do things better or what other seed beady lessons, materials and tools you want to see from me.

Happy Beading!

Monday, June 13, 2011

Bead and Button Show 2011


Stuff I Had to Share From 
the Bead & Button Show 2011

Talk about an exciting portal! 
I am there before it opened to the public, 
which is why there's no public there yet.

Doing my demos for John Bead 
on Hat/Tiara/Hair Fascinator Day. 
I showed folks all about Miyuki tila beads.
Everyone is crazy about those 
cool two-holed beads. 
(And thanks for the vintage hat, Mom!)

Ezel Findings had the most fabulous magnetic clasps including this style with Swarovski crystals on gunmetal. YUMMY! 
Sun does exquisite beadwork to show off her findings, don't you agree?

 Lea Zinke's enamel rings
as modeled by Denise Peck.
Lea's lampwork was truly stunning, too.
(Denise is the editor in chief of 
Step by Step Wire Jewelry!)

Geri Warhaftig lampwork beads 
in the Bead Dreams showcases. LOVE!

AMAZING polymer from John Rose, 
a polymer bead winner in Bead Dreams. 
Black and neolithic, no wonder I like it!

A class in copper electroplating revealed alchemy magic as nature became immortalized in metal.

Suzanne Golden's HUGE spiral bangle.
Ginormous talent in a little lady!


 As a CREATE YOUR STYLE with Swarovski Elements Ambassador, I like to feature my sparkles in modern designs, such as my latest Dragon Cuff. Thanks to everyone who admired it at the show!

At the Vintaj booth, Jess and Betsy invited me and Denise Peck to play with a rolling mill style press to imprint metal blanks. 
Check out this little video of her demo. 
A must have, I must say!

I had time to soak my barking puppies in the hotel hot tub before heading back to the airport. AHHHHHH. And now--I can't wait until the Bead and Button Show 2012!

PS: Special thanks to John Bead who brought me to the show!
If you're a wholesale designer or store owner--go register at their site at www.johnbead.com.

Wednesday, June 1, 2011

Meet me at the Bead & Button Show 2011


Come see me at the
Bead & Button Show June 10 & 11th, 2011
JOHN BEAD booth #1028-1030
(c) 2011 Leslie Rogalski All Rights Reserved to designs
and content on this site 
   
Friday June 10, 10:30am-12:30pm
Easy Bow Farfalle Bead Bangle Demo

Friday June 10, 3:00pm-5:00pm 
Miyuki Tila Bead RAW (Right Angle Weave) Cuff Demo 
Saturday June 11, 10:30am-12:30pm
Miyuki Tila Bead RAW (Right Angle Weave) Cuff Demo
Saturday June 11, 3:00pm-5:00pm
Miyuki Tila Bead Square Stitch with Herringbone Cuff Demo
Leslie Rogalski
See you there!

Monday, May 30, 2011

Upcycled jewelry: PASTA


I recently won a cool book from Bead Unique
  for my submission to their upcycled jewelry contest.
I had a bunch of stuff I'd created for
a previous April Fool's Day Beading Daily post.
  I called it FAUXLYMER jewelry.

Here's a group of pasta noodle beads. I used Sharpie marker to add color and stripes, wooden accents (Also striped with a marker) and annealed steel wire. 
Detail: This bead has a slim ziti inside another ziti. 
Ridges are colored with Sharpie marker, 
and the ends wired with annealed steel.
 My fauxlymer cuff was the piece which won me the book.
More ziti, waxed linen and wooden accent beads.

Thanks Bead Unique!